本文主要摘錄自參考資料中的 YouTube 影片,以下是驗證過的執行步驟。
▌1. 安裝 Python
重要提示:Whisper Github 中提及,Whisper 與 Python 3.8~3.11 相容,建議安裝較新的 3.11。
3.11.10 和 3.11.11 都是增加安全性,沒有單獨安裝檔,所以先安裝 3.11.09。
我這裡只放 Windows 64bit 和 macOS 的連結,其他版本請點擊上方安裝 Python 按鈕。
1-1. Windows installer (64-bit)
1-2. macOS 64-bit universal2 installer
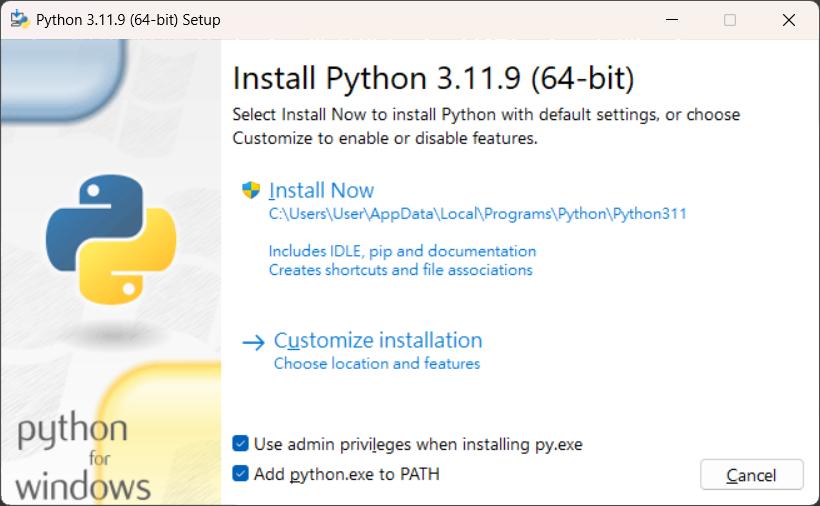
安裝方式和一般的應用程式沒什麼不同,但請 一定要勾選(如圖示)最下面一行的
![]() Add python.exe to PATH
Add python.exe to PATH
▌2. 安裝 PyTorch
選擇你想要安裝的條件,下方會出現對應的指令,複製這些指令。

然後在命令提示字元下,貼上剛剛複製的指令(按滑鼠右鍵):
C:\Users\User>
pip3 install torch torchvision torchaudio --index-url https://download.pytorch.org/whl/cu118
如果你有安裝 GPU卡(沒有的話,當然只能選 CPU),你可能會有一個問題:要選擇哪個 CUDA 版本?
請在命令提示字元下輸入 nvcc --version 即可,以下範例是 CUDA 11.8。
C:\Users\User>nvcc --version

nvcc: NVIDIA (R) Cuda compiler driver
Copyright (c) 2005-2022 NVIDIA Corporation
Built on Wed_Sep_21_10:41:10_Pacific_Daylight_Time_2022
Cuda compilation tools, release 11.8, V11.8.89
Build cuda_11.8.r11.8/compiler.31833905_0
▌3-1. 安裝 Chocolatey
這是為了方便安裝下一步的 ffmpeg。如果是 Mac,建議使用 Homebrew。
點擊進入 Chocolatey 安裝頁面 後,首先要選擇安裝方式,影片示範用 Individual,跟著照做,然後複製 Now run the following command 的內容(圖中右下側那個 Copy 的小按鈕)。

回到 Windows 工作列,搜尋處輸入 powershell,然後將滑鼠移至 Windows PowerShell,按滑鼠右鍵選擇「以系統管理員身分執行」。

再按滑鼠右鍵把剛剛複製的指令貼上。
Set-ExecutionPolicy Bypass -Scope Process -Force; [System.Net.ServicePointManager]::SecurityProtocol = [System.Net.ServicePointManager]::SecurityProtocol -bor 3072; iex ((New-Object System.Net.WebClient).DownloadString('https://community.chocolatey.org/install.ps1'))
▌3-2. 安裝 ffmpeg
安裝完 Chocolatey 之後,接著輸入 choco install ffmpeg 來安裝 ffmpeg。
choco install ffmpeg
▌4. 安裝 Whisper
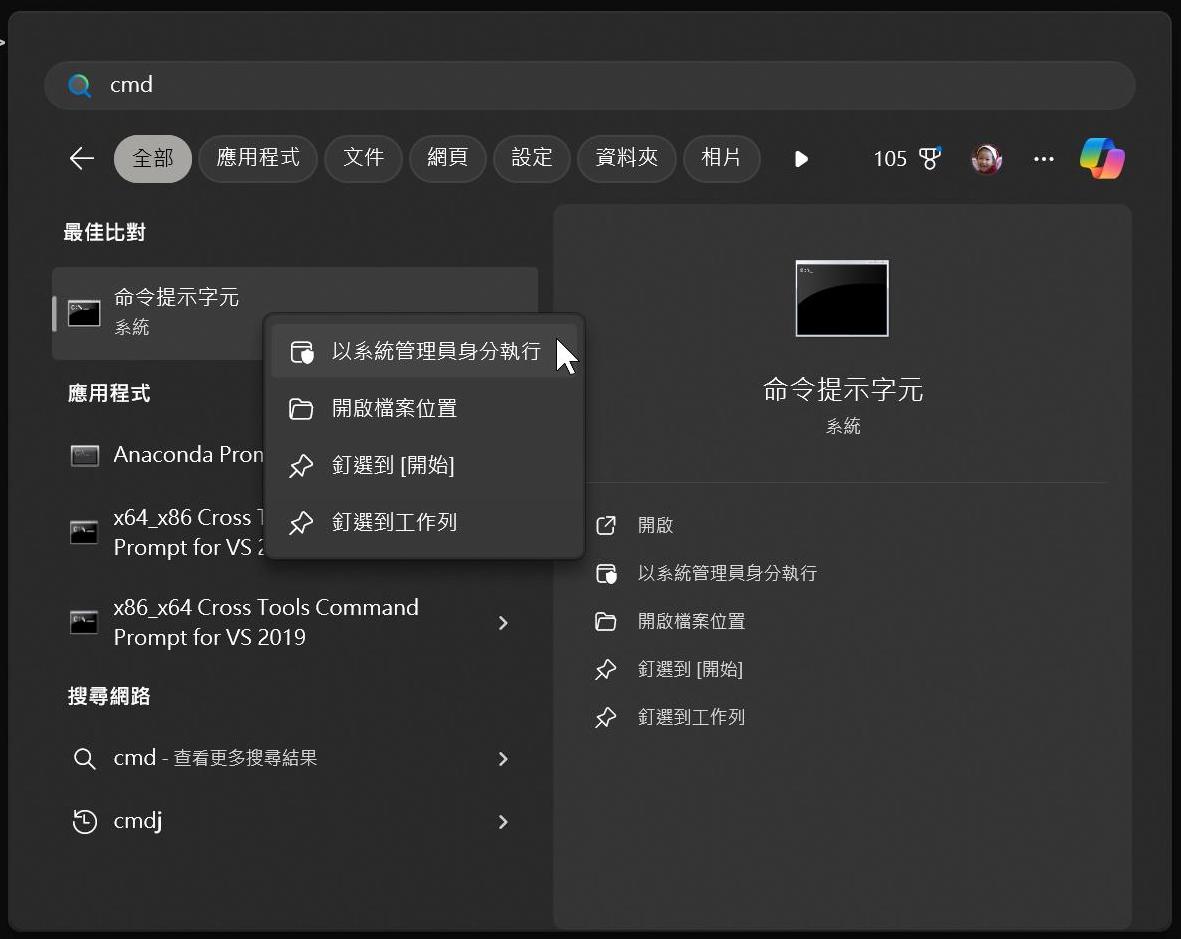
回到 Windows 工作列,搜尋處輸入 cmd,然後將滑鼠移至 命令提示字元,按滑鼠右鍵選擇「以系統管理員身分執行」。
接著輸入 pip install -U openai-whisper,安裝 whisper。
pip install -U openai-whisper
▌開始語音辨識
接著我們來測試一下語音辨識的效果。
到音檔(mp3, wav 皆可)所在路徑,輸入以下指令(Whisper 會自動辨別是哪種語言):
whisper test.mp3 --model medium
不選擇 model 的話,預設是用 small,以下是可選用的 model 選項。
| Size | Parameters | English-only model | Multilingual model | Required VRAM | Relative speed |
|---|---|---|---|---|---|
| tiny | 39 M | tiny.en |
tiny |
~1 GB | ~10x |
| base | 74 M | base.en |
base |
~1 GB | ~7x |
| small | 244 M | small.en |
small |
~2 GB | ~4x |
| medium | 769 M | medium.en |
medium |
~5 GB | ~2x |
| large | 1550 M | N/A | large |
~10 GB | 1x |
| turbo | 809 M | N/A | turbo |
~6 GB | ~8x |
說實話,效果真的很不錯,比我以前付費使用的線上語音辨識服務還好(速度更快、效果更好),而且還一次給你五種格式:JSON, srt, tsv, txt, vtt。
以下圖示為佛法轉識成智的語音辨識示範:

▌參考資料

▌延伸閱讀
我們在2023年7月,討論過 Whisper 這個主題,不過兩篇文章的目標完全不同。
本文和 OpenAI API 無關,目的在教你如何用 Whisper 來將語音檔轉為文字,完全免費(而且是最簡單的安裝方式,不考慮 Anaconda)。
之前那篇文章,重點在示範程式,如何在 Python 中呼叫 Whisper API: