The SOLID Design Principles - 物件導向設計 的五個基本原則
-
Single Responsibility Principle - 單一責任原則
-
Open-Closed Principle - 開放/封閉原則
-
Liskov Substitution Principle - 里氏替換原則
-
Interface Segregation Principle - 介面隔離原則
-
Dependency Inversion Principle - 依賴反轉原則
行前準備
Design Patterns 並非等價
不是每一種設計模式都那麼熱門。
自從 第一版設計模式出版 後(1994),各種設計模式已被程式設計師運用了不計其數。
其中有一些模式,雖然在解決特定問題得心應手,但應用的領域比較窄,他們是:
-
橋接模式 Bridge Pattern
-
建造者模式 Builder Pattern
-
責任鏈模式 Chain Of Responsibility Pattern
-
蠅量模式 Flyweight Pattern
-
解譯器模式 lnterpreter Pattern
-
仲介模式 Mediator Pattern
-
備忘錄模式 Memento Pattern
-
原型模式 Prototype Pattern
-
訪問者模式 Visitor Pattern
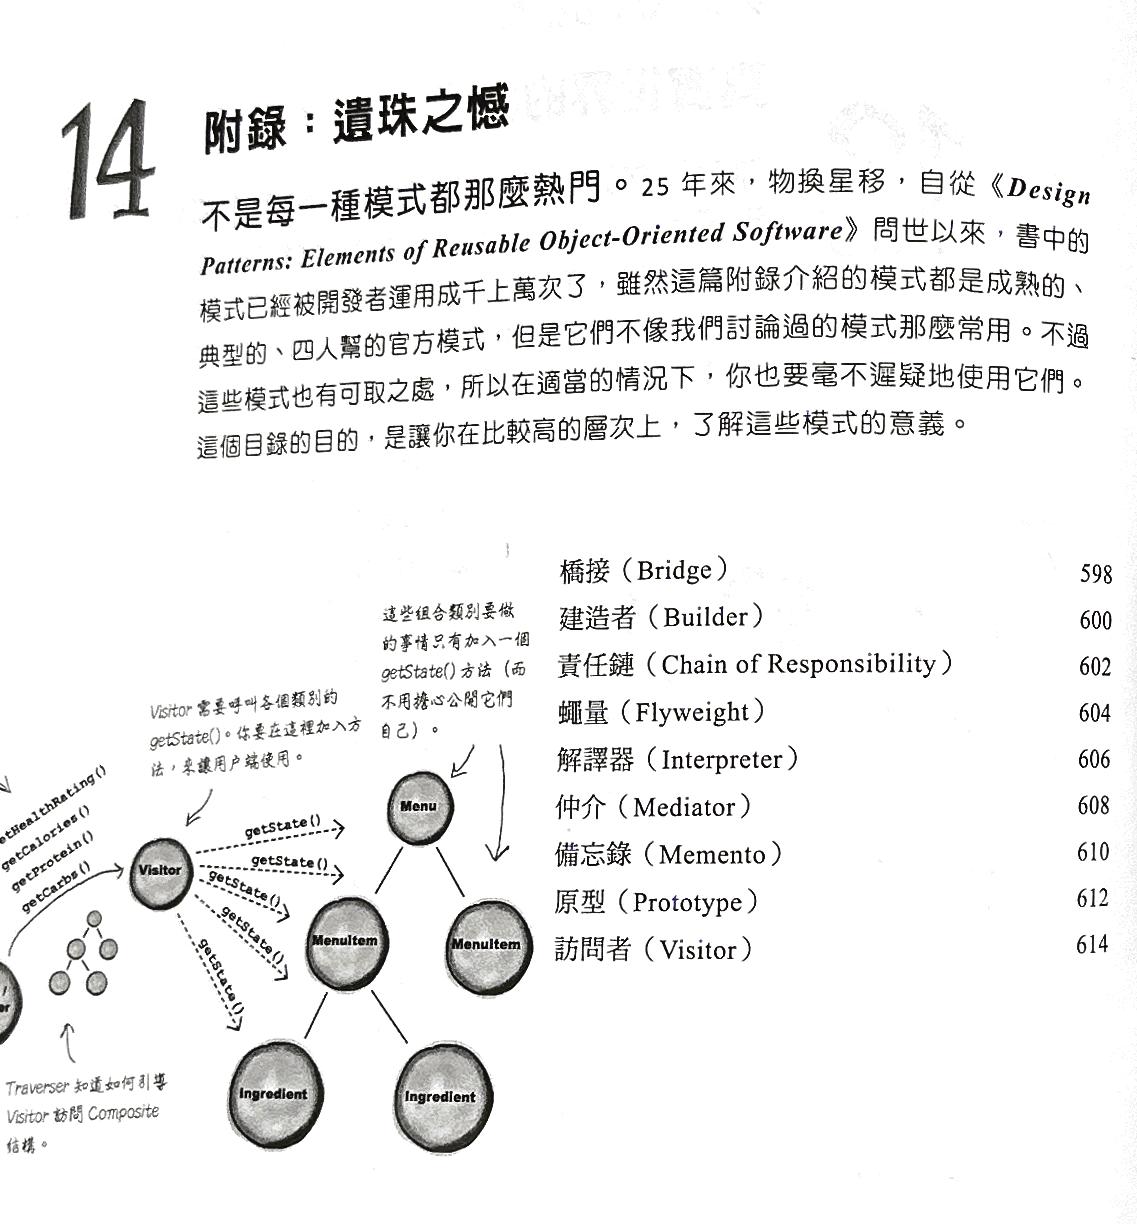
上圖來自書本:深入淺出設計模式(第二版)
GitHub Python Design Patterns
GitHub 中關於 Python Design Patterns 有不少項目,這篇是最多星的。
它整理了遠超過四人幫所提供的 23 個設計模式。
因為內容很多,我會用另一篇文章介紹,這裡先提醒大家到這裡參考。
以下本文中的中譯,部分取自前面提的書、部分取自微軟翻譯。之後會整理到我們的 中英程式譯詞對照 。
Single Responsibility Principle(SRP)
也有人稱之為 Separation Of Concerns(SOC),關注點分離。
當每個 Object 只有 一個更改理由 時,你就已經正確實現了單一責任原則。
你設計的每個 Object 只負責一件事,當那件事發生變化時,你明確知道要在程式中何處進行更改。
顧名思義,一個 object 就負責做好一件事,不要想把有的沒的都加上去,企圖做出一個 God object,什麼都要管。
Journal class 專注於處理日誌相關操作,包括新增條目、刪除條目和將日誌內容轉換成字串格式。這樣的設計使得類別有單一的職責,符合 Single Responsibility Principle。
class Journal:
    def __init__(self):
        self.entries = []

    def add_entry(self, text):
        self.entries.append(text)

    def remove_entry(self, index):
        if 0 <= index < len(self.entries):
            del self.entries[index]

    def __str__(self):
        return "\n".join(self.entries)

if __name__ == "__main__":
    journal = Journal()
    journal.add_entry("今天是星期一,開始一個新的工作週。")
    journal.add_entry("學習設計模式是一個有趣的挑戰。")
    journal.add_entry("記錄下每天的學習和工作進展。")

    print("日誌內容:")
    print(journal)

    print("\n刪除第二個條目後的日誌內容:")
    journal.remove_entry(1)
    print(journal)
為了保持 Single Responsibility Principle,我們可以建立一個獨立的 PersistenceManager class,專門處理日誌的存取操作,例如將日誌寫入檔案和從檔案中讀取日誌。
這樣,Journal 類別仍然專注於日誌操作,而 PersistenceManager 負責處理存取操作。
class PersistenceManager:
    @staticmethod
    def save_to_file(journal, filename):
        with open(filename, 'w') as file:
            file.write(str(journal))

    @staticmethod
    def load_from_file(filename):
        with open(filename, 'r') as file:
            contents = file.read()
            journal = Journal()
            for entry in contents.split('\n'):
                journal.add_entry(entry)
            return journal

if __name__ == "__main__":
    journal = Journal()
    journal.add_entry("今天是星期一,開始一個新的工作週。")
    journal.add_entry("學習設計模式是一個有趣的挑戰。")
    journal.add_entry("記錄下每天的學習和工作進展.")

    print("日誌內容:")
    print(journal)

    # 儲存日誌到檔案
    PersistenceManager.save_to_file(journal, "my_journal.txt")

    # 從檔案中讀取日誌
    loaded_journal = PersistenceManager.load_from_file("my_journal.txt")
    print("\n從檔案讀取的日誌內容:")
    print(loaded_journal)
發現多重責任的簡單測試
對 class 中的每個 method,開始時都寫下這行:
The <classname> <method> itself.然後問自己:每行都有意義嗎?這個 class 真的有該 method 所指示的責任嗎?
如果沒有,您使用該 method 可能違反了 SRP。考慮將該 method 移轉到另外的 class。
範例:你在設計汽車這個 class 時,考慮將以下 methods 放這去。
  class Automobile
    start()
    stop()
    changeTires()
    drive()
    wash()
    checkOil()
    getOil()
依照前面說的方法 The <classname> <method> itself,我們把每個 method 都這樣寫,然後把不符合的 methods 刪除:
-
The Automobile start(s) itself.
-
The Automobile stop(s) itself.
-
The Automobile changes tires itself. -
The Automobile drive(s) itself. -
The Automobile wash(es) itself. -
The Automobile checks oil itself. -
The Automobile gets oil itself.
同樣的,在判斷其他的 class 來處理原先 class 時,也是使用類似的方式。例如:
![]()
The Automobile wash(es) itself.
![]() The CarWash washes (an) automobile itself.
The CarWash washes (an) automobile itself.
上述分析方法與 具有參數的 method 一起使用時,我們可以在方法中包含參數
當我們把不符合的功能,從 class Automobile 移到其他 class 後,就變成這樣:
  class Automobile
    start()
    stop()
    getOil()

  class Driver  # 雖然現在其實有自駕車了
    drive(Automobile)

  class Carwash
    wash(Automobile)

  class Mechanic
    changeTires(Automobile, Tires[*])
    checkOil(Automobile)
老師的其他碎唸
寫在一起的壞處
Anti-Pattern: God object…
Open-Closed Principle(OCP)
Open for extension, Closed for modification
class 應該 對擴展開放,對修改關閉。
允許更改 ,但透過 無需修改現有程式碼 的方式修改。
State space explosion
ToDo: 書籍第三章 page 86, 書籍第九章 page 355, 書籍第十章 page 392
範例:商品特產包含 size, color, … 等,如果撰寫一個合適的篩選器。
whenever we add new filters, we add them through extension, not through modification.
enterprise pattern
specification pattern
說明:以下的程式,是 ChatGPT 產生的。我只是說明我想要的目標,但程式和老師的實在太相似。據此推測,應該是古老的設計模式一書中,有類似的介紹,並且在 Python 問世後,有人寫的範例程式已被廣泛流傳。
OCP 1. class product & class Specification related
from enum import Enum

class Size(Enum):
    SMALL = 1
    MEDIUM = 2
    LARGE = 3

class Color(Enum):
    RED = 1
    GREEN = 2
    BLUE = 3

class Product:
    def __init__(self, name, size, color):
        self.name = name
        self.size = size
        self.color = color

class Specification:
    def is_satisfied(self, item):
        pass

class ColorSpecification(Specification):
    def __init__(self, color):
        self.color = color

    def is_satisfied(self, item):
        return item.color == self.color

class SizeSpecification(Specification):
    def __init__(self, size):
        self.size = size

    def is_satisfied(self, item):
        return item.size == self.size
OCP 2. class Filter related
class Filter:
    def filter(self, items, spec):
        pass

class MultiFilter(Filter):
    def filter(self, items, specs):
        for spec in specs:
            items = [item for item in items if spec.is_satisfied(item)]
        return items
OCP 3. 實際建立一些產品來驗證
# 建立一些商品範例
product1 = Product("Red Shirt", Size.MEDIUM, Color.RED)
product2 = Product("Blue Jeans", Size.LARGE, Color.BLUE)
product3 = Product("Green Hat", Size.SMALL, Color.GREEN)
product4 = Product("Red Dress", Size.LARGE, Color.RED)
product5 = Product("Blue Jacket", Size.MEDIUM, Color.BLUE)

products = [product1, product2, product3, product4, product5]

# 1. 篩選出 color 同是 RED 的商品
red_spec = ColorSpecification(Color.RED)
red_products = multi_filter.filter(products, [red_spec])

print("商品篩選 - 同是 RED 的商品:")
for product in red_products:
    print(f"Product: {product.name}, Size: {product.size}, Color: {product.color}")

# 2. 篩選出 size 同是 LARGE 的商品
large_spec = SizeSpecification(Size.LARGE)
large_products = multi_filter.filter(products, [large_spec])

print("\n商品篩選 - 同是 LARGE 的商品:")
for product in large_products:
    print(f"Product: {product.name}, Size: {product.size}, Color: {product.color}")

# 3. 最後篩選出 color 是 RED, size 是 LARGE 的商品
red_large_products = multi_filter.filter(products, [red_spec, large_spec])

print("\n商品篩選 - 同時是 RED 和 LARGE 的商品:")
for product in red_large_products:
    print(f"Product: {product.name}, Size: {product.size}, Color: {product.color}")
輸出:
商品篩選 - 同是 RED 的商品:
Product: Red Shirt, Size: Size.MEDIUM, Color: Color.RED
Product: Red Dress, Size: Size.LARGE, Color: Color.RED

商品篩選 - 同是 LARGE 的商品:
Product: Blue Jeans, Size: Size.LARGE, Color: Color.BLUE
Product: Red Dress, Size: Size.LARGE, Color: Color.RED

商品篩選 - 同時是 RED 和 LARGE 的商品:
Product: Red Dress, Size: Size.LARGE, Color: Color.RED
Liskov Substitution Principle(LSP)
花木蘭代父從軍:你預期父親會做的事,叫小孩去做時,一樣可以做得好好的。
里氏替換原則就是 設計正確的繼承方式,子類型必須可替換其父類型,使用在函式中。
如果你違反了里氏替換原則(老師範例中的正方形繼承矩形),就表示你未能正確設計。
問題通常是由於過度使用或不正確地使用繼承造成的。
除了繼承,你還可以使用委派、組合、聚合三種方式(Delegation, Composition, Aggregation)
-
委派 - 委派是指將特定任務的責任移交給另一個類或方法。
-
組合 - 組合允許您使用一系列其他類的行為,並在運行時更改該行為。
-
聚合 - 聚合是指一個類被用作另一個類的一部分,但仍然存在於該另一個類之外。
老師示範錯誤的範例,我們就不看了。
以下範例是會飛的鳥類(麻雀)和不會飛的鳥類(企鵝),如何不違反里氏替換原則的做法。
class Bird:
    def fly(self):
        pass

class Sparrow(Bird):
    def fly(self):
        print("Sparrow can fly")

class Penguin(Bird):
    def fly(self):
        print("Penguin cannot fly")

def make_bird_fly(bird):
    bird.fly()

# 測試 Liskov Substitution Principle
sparrow = Sparrow()
penguin = Penguin()

make_bird_fly(sparrow)  # 正確的行為:Sparrow 可以飛
make_bird_fly(penguin)  # 正確的行為:Penguin 不能飛
以下範例改寫自 freeCodeCamp:
動物會叫,繼承自動物的貓和狗,也叫得很自然。
class Animal:
    def __init__(self, name):
        self.name = name

    def makeSound(self):
        print(f"{self.name} makes a sound")

class Dog(Animal):
    def makeSound(self):
        print(f"{self.name} barks")

class Cat(Animal):
    def makeSound(self):
        print(f"{self.name} meows")

def makeAnimalSound(animal):
    animal.makeSound()

cheetah = Animal('Cheetah')
makeAnimalSound(cheetah)  # Cheetah makes a sound

dog = Dog('Jack')
makeAnimalSound(dog)  # Jack barks

cat = Cat('Khloe')
makeAnimalSound(cat)  # Khloe meows
承上,同樣繼承自動物,但違反里氏替換原則的範例:(我覺得例子沒有很好,或者是我誤會了這個原則)
Bird 繼承自Animal, 但 Bird 引入了一個父類別 Animal 中不存在的新行為 fly 。
這意味著將 Bird 物件傳遞給期望 Animal 的函數時,它將無法處理 fly 方法。
class Bird(Animal):
    def fly(self):
        print(f"{self.name} flaps wings")

parrot = Bird('Titi the Parrot')
makeAnimalSound(parrot)  # Titi the Parrot makes a sound
parrot.fly()  # Titi the Parrot flaps wings
-
子類別
Bird繼承自父類別Animal,並覆寫了makeSound方法以提供新的實作方式,但這並不會導致不一致的行為。這是因為makeSound方法在行為上仍然與父類別Animal相容。 -
Bird子類別引入了一個新的方法fly,但這個新方法是合理的,因為鳥類通常具有飛行的能力。在這個情況下,Bird類別提供了對Animal類別的擴充,而不是不一致的行為。 -
在範例中,我們可以安全地將
Bird物件傳遞給makeAnimalSound函數,並呼叫fly方法,因為Bird子類別遵守了LSP,它是Animal的有效替代。
class Bird(Animal):
    def makeSound(self):
        print(f"{self.name} chirps")

    def fly(self):
        print(f"{self.name} flaps wings")

parrot = Bird('Titi the Parrot')
makeAnimalSound(parrot)  # Titi the Parrot chirps
parrot.fly()  # Titi the Parrot flaps wings
Interface Segregation Principle(ISP)
與單一責任原則相似,本原則建議將一個大型介面拆分成多個小型介面,客戶端只需要處理與他們相關的介面。
這樣可以降低 class 之間的耦合性(coupling,即依賴程度 dependency),提高程式碼的可維護性和靈活性。
老師的程式碼是以 print, fax, scan 介面的設計為例示範,程式很簡單,這裡不贅述。
為甚麼需要Abstract Classes?
-
父類別定義了抽象類別,就好比定義了一組 Application Program Interface(API),規範子類別必須遵守。
-
API 規範好之後,外界 third-party 第三方軟體(例如外掛程式等)就有了設計準則,只要依照準則實作出內容即可。
-
大型專案中,定義抽象類別可以幫助團隊成員不致遺漏某些方法。
假設我們正在開發一個圖形編輯器應用程序,我們需要定義一個介面來處理不同類型的圖形,例如矩形和圓形。
from abc import ABC, abstractmethod

class Shape(ABC):
    @abstractmethod
    def draw(self):
        pass

    @abstractmethod
    def resize(self, factor):
        pass
然後將圖形拆分成矩形和圓形兩種類型,每種類型實現自己所需的方法:
class Rectangle(Shape):
    def draw(self):
        print("Drawing a rectangle")

    def resize(self, factor):
        print(f"Resizing the rectangle by {factor}")

class Circle(Shape):
    def draw(self):
        print("Drawing a circle")

    def resize(self, factor):
        print(f"Resizing the circle by {factor}")
現在我們可以使用這些 class 來創建不同類型的圖形,而不需要實作不必要的方法。
def main():
    rectangle = Rectangle()
    circle = Circle()

    rectangle.draw()
    rectangle.resize(2)

    circle.draw()
    circle.resize(1.5)

if __name__ == "__main__":
    main()
另一個例子,我們先示範未實行介面隔離原則的作法,然後接著說明如何修改。
class Animal 包含了所有可能的動作,包括 swim 和 fly ,但這些動作不適用於所有動物,這就導致了不必要的方法實現,不符合 ISP 的原則。
class Animal:
    def __init__(self, name):
        self.name = name

    def eat(self):
        print(f"{self.name} is eating")

    def swim(self):
        print(f"{self.name} is swimming")

    def fly(self):
        print(f"{self.name} is flying")


class Fish(Animal):
    def fly(self):
        print("ERROR! Fishes can't fly")


class Bird(Animal):
    def swim(self):
        print("ERROR! Birds can't swim")


bird = Bird('Titi the Parrot')
bird.swim()  # ERROR! Birds can't swim

fish = Fish('Neo the Dolphin')
fish.fly()  # ERROR! Fishes can't fly
要實施 ISP,我們應該將通用的 Animal 類拆分成多個小型介面或基類,每個介面或基類僅包含與特定類型的動物相關的方法。
在以下的改進版本中,我們將 Animal 類拆分成 Swimmer 和 Flyer 兩個基類,每個基類包含一個特定的動作。然後,Fish 和 Bird 子類分別繼承 Swimmer 或 Flyer。
這樣我們可以確保每個子類僅實現其需要的方法,並避免不必要的方法。
class Animal:
    def __init__(self, name):
        self.name = name

    def eat(self):
        print(f"{self.name} is eating")

class Swimmer:
    def swim(self):
        pass

class Flyer:
    def fly(self):
        pass

class Fish(Animal, Swimmer):
    pass

class Bird(Animal, Flyer):
    pass

bird = Bird('Titi the Parrot')
bird.swim()  # ERROR! Birds can't swim

fish = Fish('Neo the Dolphin')
fish.fly()  # ERROR! Fishes can't fly
Dependency Inversion Principle(DIP)
高級模組不應直接依賴於低級模組,應該依賴於抽象。
抽象:某種抽象 class 或具有抽象方法的 class。
這節老師舉的例子,示範了錯誤方式,然後再修正。
from abc import abstractmethod
from enum import Enum

class Relationship(Enum):
    PARENT = 0
    CHILD = 1
    SIBLING = 2

class Person:
    def __init__(self, name):
        self.name = name

class RelationshipBrowser:
    @abstractmethod
    def find_all_children_of(self, name): pass

class Relationships(RelationshipBrowser):  # low-level
    relations = []

    def add_parent_and_child(self, parent, child):
        self.relations.append((parent, Relationship.PARENT, child))
        self.relations.append((child, Relationship.PARENT, parent))

    def find_all_children_of(self, name):
        for r in self.relations:
            if r[0].name == name and r[1] == Relationship.PARENT:
                yield r[2].name

class Research:
    # dependency on a low-level module directly
    # bad because strongly dependent on e.g. storage type

    # def __init__(self, relationships):
    #     # high-level: find all of john's children
    #     relations = relationships.relations
    #     for r in relations:
    #         if r[0].name == 'John' and r[1] == Relationship.PARENT:
    #             print(f'John has a child called {r[2].name}.')

    def __init__(self, browser):
        for p in browser.find_all_children_of("John"):
            print(f'John has a child called {p}')

parent = Person('John')
child1 = Person('Chris')
child2 = Person('Matt')

# low-level module
relationships = Relationships()
relationships.add_parent_and_child(parent, child1)
relationships.add_parent_and_child(parent, child2)

Research(relationships)
ChatGPT 範例:
先定義一個抽象的通知接口 Notification ,然後實現了兩個具體的通知類別EmailNotification 和 SMSNotification ,它們都繼承自 Notification 。
我們有一個高層次的模組 UserManager ,它的建構子接受一個通知對象作為參數,並使用這個通知對象來發送通知。這樣,高層次的模組不需要知道具體的通知實現,只需要知道通知接口。
# 定義一個抽象的通知接口
class Notification:
    def send(self, message):
        pass

# 實現Email通知
class EmailNotification(Notification):
    def send(self, message):
        print(f"發送郵件通知: {message}")

# 實現短信通知
class SMSNotification(Notification):
    def send(self, message):
        print(f"發送短信通知: {message}")

# 高層次的模組,它依賴於通知接口而不是具體的通知實現
class UserManager:
    def __init__(self, notification):
        self.notification = notification

    def send_notification(self, user, message):
        self.notification.send(f"{user}: {message}")

# 使用範例
if __name__ == "__main__":
    email_notification = EmailNotification()
    sms_notification = SMSNotification()

    # 使用Email通知
    user_manager = UserManager(email_notification)
    user_manager.send_notification("Alice", "歡迎加入我們的網站!")

    # 使用短信通知
    user_manager = UserManager(sms_notification)
    user_manager.send_notification("Bob", "您的訂單已出貨!")