151、152 MetaClass Parameters – Lecture & Coding:
- 151、152 這兩段教學影片主要在講如何在 __new__ 傳入參數這件事。
- 從 \color{salmon}{Python 3.6} 起 \color{lightcyan}{Metaclass.\_\_new\_\_} 可允許帶入參數進來~
- 當我們使用 \color{greenyellow}{Metaclass} 來創建一個 \color{greenyellow}{Custom\:Class} ,可帶入要附加到 \color{greenyellow}{Custom\:Class} 的參數,但參數要求必須是具名參數 。
class Metaclass(type):
    def __new__(cls, name, bases, cls_dict, arg1, arg2, arg3=None):
        return super().__new__(cls, name, bases, cls_dict)
- 如果於 \color{lightcyan}{Metaclass.\_\_new\_\_} 中使用非具名參數,會拋出 \color{lightcyan}{TypeError} 例外~
- 為何必須是具名參數? 因為需要跟原本繼承的 \color{greenyellow}{Parent\: Class} 的位置參數作區別。
class Metaclass(type):
    def __new__(cls, name, bases, cls_dict, arg1, arg2, arg3=None):
        print("Metaclass.__new__ called")
        cls_dict['arg1'] = arg1
        cls_dict['arg2'] = arg2
        cls_dict['arg3'] = arg3
        return super().__new__(cls, name, bases, cls_dict)


paras = [10, 20, 30];
class MyClass(metaclass = Metaclass, *paras):
    pass;
'''
輸出:
TypeError                                 Traceback (most recent call last)
d:\Chris_Doc\Python_Learning\jypter_notebook\python-deepdive-main\Part 4\Section 14 - Metaprogramming\Note151To157Clips.ipynb Cell 4 in 1
      7         return super().__new__(cls, name, bases, cls_dict)
      9 paras = [10, 20, 30]
---> 10 class MyClass(metaclass = Metaclass, *paras):
     11     pass

TypeError: metaclass conflict: the metaclass of a derived class must be a (non-strict) subclass of the metaclasses of all its bases
'''

'''
# 如改成下面這樣,就沒問題~
paras = {'arg1': 10, 'arg2': 20, 'arg3': 30}
class MyClass(metaclass = Metaclass, **paras):
    pass
'''
- 三種於 \color{lightcyan}{\_\_new\_\_} (or \color{lightcyan}{\_\_prepare\_\_} ) 傳入參數的方式:
- 使用 \color{salmon}{具名參數} 傳入
- 使用 \color{salmon}{字典物件} 傳入
- 透過 \color{salmon}{屬性設置} (第二種做法的變形)
class Metaclass(type):
    def __new__(cls, name, bases, cls_dict, arg1, arg2, arg3=None):
        print("Metaclass.__new__ called")
        cls_dict['arg1'] = arg1
        cls_dict['arg2'] = arg2
        cls_dict['arg3'] = arg3
        return super().__new__(cls, name, bases, cls_dict)

# 標準做法 -- 使用 具名參數 傳入
class MyClass(metaclass = Metaclass, arg1=10, arg2=20, arg3=30):
    pass

for key, value in MyClass.__dict__.items():
    if not key.startswith('__'):
        print(f'MyClass.{key} = {value}')

# 作法二 -- 使用 字典物件 傳入
class AutoClassAttrib(type):
    def __new__(cls, name, bases, cls_dict, extra_attrs=None):
        if extra_attrs:
            print('Creating class with some extra attributes: ', extra_attrs)
            # here I'm going to things directly into the cls_dict namespace
            # but could also create the class first, then add using setattr
            for attr_name, attr_value in extra_attrs:
                cls_dict[attr_name] = attr_value
        return super().__new__(cls, name, bases, cls_dict)

class Account(metaclass=AutoClassAttrib, extra_attrs=[('account_type', 'Savings'), ('apr', 0.5)]):
    pass

vars(Account)

# 作法三 -- 透過屬性設置
class AutoClassAttrib(type):
    def __new__(cls, name, bases, cls_dict, **kwargs):
        new_cls = super().__new__(cls, name, bases, cls_dict)
        if kwargs:
            print('Creating class with some extra attributes: ', kwargs)
            for attr_name, attr_value in kwargs.items():
                setattr(new_cls, attr_name, attr_value)
        return new_cls

class Account(metaclass=AutoClassAttrib, account_type='Savings', apr=0.5):
    pass
153、154 The __prepare__ Method – Lecture & Coding:
- 當 \color{greenyellow}{Metaclass} 經由 \color{lightcyan}{class MyClass(metaclass = MyMeta)} 宣告, \color{greenyellow}{Metaclass} 就會被呼叫來創建這個 \color{greenyellow}{Custom\: Class} :
- 由於繼承的關係, \color{salmon}{Python} 會去執行 \color{lightcyan}{metaclass.\_\_new\_\_}
- \color{greenyellow}{metaclass} 會經由 \color{lightcyan}{\_\_new\_\_} method 來創建 \color{greenyellow}{class\: (mcls)}
- 返回 \color{greenyellow}{class} 的 \color{salmon}{name}
- 返回 繼承的 \color{lightcyan}{bases}
- 返回 \color{greenyellow}{class} \color{lightcyan}{namespaces} → \color{lightcyan}{cls\_dict}
- 然而 \color{lightcyan}{cls\_dict} 是從何而來?
- 是經由 \color{lightcyan}{\_\_prepare\_\_} 而創建出來的
- 由 \color{lightcyan}{type} 來 implement 產生
- 由 \color{lightcyan}{type} 來 implement 產生
- 是經由 \color{lightcyan}{\_\_prepare\_\_} 而創建出來的
- \color{greenyellow}{metaclass} 會經由 \color{lightcyan}{\_\_new\_\_} method 來創建 \color{greenyellow}{class\: (mcls)}
- 由於繼承的關係, \color{salmon}{Python} 會去執行 \color{lightcyan}{metaclass.\_\_new\_\_}
\color{salmon}{Reference\: from: } Python Metaclass(type) - DEV Community
- \color{lightcyan}{\_\_prepare\_\_} :
- 是 \color{lightcyan}{type} 下的一個 method
- 既然是 \color{lightcyan}{type} 下的 method,就能 override 複寫它
- 它也是一個 \color{salmon}{靜態方法} 。
- \color{salmon}{Python} 會在觸發 \color{lightcyan}{\_\_new\_\_} 之前觸發 \color{lightcyan}{\_\_prepare\_\_} (當使用 \color{lightcyan}{class MyClass(metaclass=MyMeta)} 來創建 \color{greenyellow}{class} 時)
- \color{salmon}{附加的參數(必須是具名參數)} 和 \color{lightcyan}{\_\_new\_\_} 相似,同樣可透過 \color{lightcyan}{\_\_prepare\_\_} 傳入
- 提供 \color{lightcyan}{\_\_new\_\_} 以外傳入內置參數的可選方法(optional method)
- 其返回的值就是這個 \color{greenyellow}{class} 的 \color{lightcyan}{namespace} (class dictionary)
- 以此來初始化傳入的 \color{lightcyan}{cls\_dict} 參數,經過 \color{lightcyan}{\_\_prepare\_\_} 會完成 \color{lightcyan}{cls\_dict} 的 \color{lightcyan}{namespace} 填充~
- 不可以複寫 \color{lightcyan}{\_\_prepare\_\_} ,但要求其返回物件為非 \color{lightcyan}{dict} 物件的返回值,例如 \color{lightcyan}{str} 或 \color{lightcyan}{int}
- 其返回值必須是 \color{lightcyan}{dict\: type} ,可以是 \color{lightcyan}{OrdereDict} 或 \color{lightcyan}{Custom\: Dict} (當為 \color{lightcyan}{Custom\: Dict} 物件時,此 \color{lightcyan}{Custom\: Dict} 物件必須繼承自 \color{lightcyan}{Standard Dict} ,但不可以繼承自 \color{lightcyan}{UserDict} ,因為 \color{lightcyan}{UserDict} 不是 \color{lightcyan}{Standard Dict} 。
- 如果我們不複寫 \color{lightcyan}{\_\_prepare\_\_} ,只是沿用 \color{lightcyan}{bases} 的繼承:
- 那預設 \color{lightcyan}{\_\_prepare\_\_} 返回的是一個空值的 \color{lightcyan}{cls\_dict}
- 是 \color{lightcyan}{type} 下的一個 method
class MyMeta(type):
    def __prepare__(name, bases, **kwargs):
        print(f'MyMeta.__prepare__ called... with {kwargs}')
        # we could create a new dictionary and insert everything we need from kwargs
        # or we could just use the kwargs dictionary directly
        kwargs['bonus_attr'] = 'Python rocks!' # <-- 直接在 __prepare__ 中添加属性
        return kwargs

    def __new__(cls, name, bases, cls_dict, **kwargs):
        print('MyMeta.__new__ called...')
        print('\tcls: ', cls, type(cls))
        print('\tname:', name, type(name))
        print('\tbases: ', bases, type(bases))
        print('\tcls_dict:', cls_dict, type(cls_dict))
        print('\tkwargs:', kwargs)
        return super().__new__(cls, name, bases, cls_dict)

    def __init__(cls, name, bases, cls_dict, **kwargs):
        print('MyMeta.__init__ called...')
        print('\tcls: ', cls, type(cls))
        print('\tname:', name, type(name))
        print('\tbases: ', bases, type(bases))
        print('\tcls_dict:', cls_dict, type(cls_dict))
        print('\tkwargs:', kwargs)
        return super().__init__(name, bases, cls_dict)

class MyClass(metaclass = MyMeta, kw1=1, kw2=2):
    pass
'''
輸出:
MyMeta.__prepare__ called... with {'kw1': 1, 'kw2': 2}
MyMeta.__new__ called...
	cls:  <class '__main__.MyMeta'> <class 'type'>
	name: MyClass <class 'str'>
	bases:  () <class 'tuple'>
	cls_dict: {'kw1': 1, 'kw2': 2, 'bonus_attr': 'Python rocks!', '__module__': '__main__', '__qualname__': 'MyClass'} <class 'dict'>
	kwargs: {'kw1': 1, 'kw2': 2}
MyMeta.__init__ called...
	cls:  <class '__main__.MyClass'> <class '__main__.MyMeta'>
	name: MyClass <class 'str'>
	bases:  () <class 'tuple'>
	cls_dict: {'kw1': 1, 'kw2': 2, 'bonus_attr': 'Python rocks!', '__module__': '__main__', '__qualname__': 'MyClass'} <class 'dict'>
	kwargs: {'kw1': 1, 'kw2': 2}
'''
155 Classes, Metaclasses, and __call__:
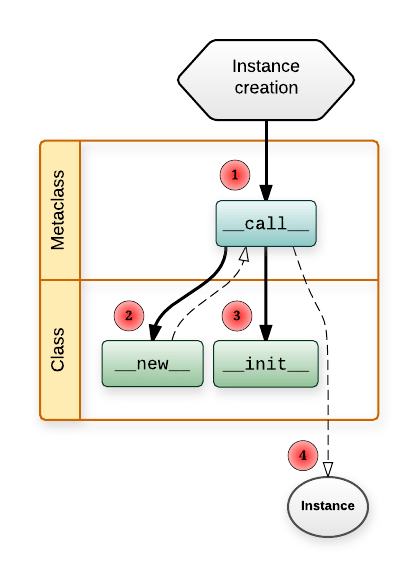
- 編號155這一段課程影片主要是講解從 MetaClass Create Class 的流程
- 當 Python 執行下面這段程式碼:
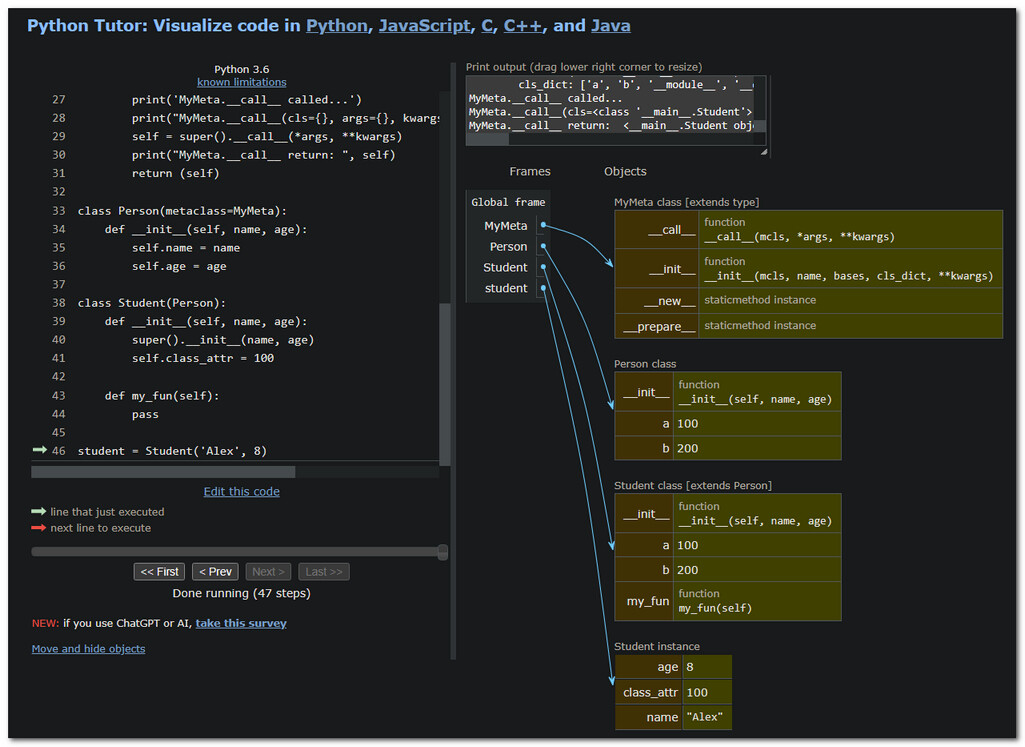
class MyMeta(type):
    @staticmethod
    def __prepare__(name, bases, **kwargs):
        print('MyMeta.__prepare__ called...')
        print('\tname:', name)
        print('\tkwargs:', kwargs)
        return {'a': 100, 'b': 200}

    def __new__(mcls, name, bases, cls_dict, **kwargs):
        print('MyMeta.__new__ called...')
        print('\tcls: ', mcls, type(mcls))
        print('\tname:', name, type(name))
        print('\tbases: ', bases, type(bases))
        print('\tcls_dict:', cls_dict, type(cls_dict))
        print('\tkwargs:', kwargs)
        return super().__new__(mcls, name, bases, cls_dict)

    def __init__(mcls, name, bases, cls_dict, **kwargs):
        print('MyMeta.__init__ called...')
        print('\tcls: ', mcls, type(mcls))
        print('\tname:', name, type(name))
        print('\tbases: ', bases, type(bases))
        print('\tcls_dict:', list(cls_dict.keys()), type(cls_dict))
        return super().__init__(name, bases, cls_dict)

    def __call__(mcls, *args, **kwargs):
        print('MyMeta.__call__ called...')
        print("MyMeta.__call__(cls={}, args={}, kwargs={}".format(mcls, args, kwargs))
        self = super().__call__(*args, **kwargs)
        print("MyMeta.__call__ return: ", self)
        return (self)

class Person(metaclass=MyMeta):
	def __init__(self, name, age):
		self.name = name
		self.age = age

class Student(Person):
	def __init__(self, name, age):
		super().__init__(name, age)
		self.class_attr = 100

	def my_fun(self):
		pass

student = Student('Alex', 8)
- 如我們將上述這段程式碼的執行在時序上畫成流程圖,則整個 \color{greenyellow}{Metaclass} 創建 \color{greenyellow}{Custom\: Class} 的流程會如下:
- 如果還不是很清楚上面的流程示意,可以仿照先前 Sky 版大推薦的,到 Python Tutor 視覺化逐行執行程式 站台,將上述程式碼,貼到編輯視窗上執行,逐步來看整個流程的變化。

156 Metapropramming Application 1:
- 老師反覆使用過的 2D、3D 座標範例又來了
- 要創建一個 2D、3D 的類別物件,一般其樣板(boiled-plate)程式碼如下:
class Point2D:
    __slots__ = ('_x', '_y') # __slot__ 是用來限定要綁定的屬性名稱

    def __init__(self, x, y):
        self._x = x
        self._y = y

    @property
    def x(self):
        return self._x

    @property
    def y(self):
        return self._y

    def __eq__(self, other):
        return isinstance(other, Point2D) and (self.x, self.y) == (other.x, other.y)

    def __hash__(self):
        return hash((self.x, self.y))

    def __repr__(self):
        return f'Point2D({self.x}, {self.y})'

    def __str__(self):
        return f'({self.x}, {self.y})'

class Point3D:
    __slots__ = ('_x', '_y', '_z')

    def __init__(self, x, y, z):
        self._x = x
        self._y = y
        self._z = z

    @property
    def x(self):
        return self._x

    @property
    def y(self):
        return self._y

    @property
    def z(self):
        return self._z

    def __eq__(self, other):
        return isinstance(other, Point3D) and (self.x, self.y, self.z) == (other.x, other.y, other.z)

    def __hash__(self):
        return hash((self.x, self.y, self.z))
    def __repr__(self):
        return f'Point2D({self.x}, {self.y}, {self.z})'

    def __str__(self):
        return f'({self.x}, {self.y}, {self.z})'
- 這一節老師要示範如何使用剛學的 \color{greenyellow}{MetaClass} 元類別的概念,來簡化製作一個萬用的範型創建客製化類別 ( \color{greenyellow}{Custom\: Class} ) 樣板類別。
- 由於 \color{lightcyan}{type} 是所有類別的 \color{greenyellow}{MetaClass} ,因此我們要創建一個元類別繼承自 \color{lightcyan}{type} ,此元類別是要用來讓其他類別繼承,使其一繼承之後,就能具備上述在類別創建時所需建立的所有屬性和方法
- 一開始我們先設定一個次要目標,先只要讓這個元類別能夠自動創建所有的屬性出來即可~
class SlottedStruct(type):
    def __new__(cls, name, bases, class_dict):
        cls_object = super().__new__(cls, name, bases, class_dict)

        # setup the __slots__
        setattr(cls_object, '__slots__', [f'_{field}' for field in cls_object._fields])

        # create read-only property for each field
        for field in cls_object._fields:
            slot = f'_{field}'
            # this will not work!
            # remember about how closures work! The free variable is resolved when the function is called!
            #     setattr(cls_object, field, property(fget=lambda self: getattr(self, slot)))
            # so instead we have to use this workaround, by specifying the slot as a defaulted argument
            setattr(cls_object, field, property(fget=lambda self, attrib=slot: getattr(self, attrib)))
        return cls_object

# 使用新類別 Person 來驗證繼承 SlottedStruct MetaClass 後,能否自動創建屬性
class Person(metaclass=SlottedStruct):
    _fields = ['name', 'age']

    def __init__(self, name, age):
        self._name = name
        self._age = age

from pprint import pprint
pprint(vars(Person))

p = Person('Alex', 19)
print(p.name)
print(p.age)
'''
輸出:
mappingproxy({'__dict__': <attribute '__dict__' of 'Person' objects>,
              '__doc__': None,
              '__init__': <function Person.__init__ at 0x0000023FE2449120>,
              '__module__': '__main__',
              '__slots__': ['_name', '_age'],
              '__weakref__': <attribute '__weakref__' of 'Person' objects>,
              '_fields': ['name', 'age'],
              'age': <property object at 0x0000023FE22AE840>,
              'name': <property object at 0x0000023FE22AC9A0>})
Alex
19
'''
- 看來目前的元類別創建的都沒問題,能如預期讓從這個元類別創建的類別,自動將屬性設定好,接著我們來擴展這個元類別,讓它連 \color{lightcyan}{\_\_str\_\_、\_\_repr\_\_、\_\_eq\_\_、\_\_hash\_\_} 等內建方法都能自動創建起來~
class SlottedStruct(type):
    def __new__(cls, name, bases, class_dict):
        cls_object = super().__new__(cls, name, bases, class_dict)

        # setup the __slots__
        setattr(cls_object, '__slots__', [f'_{field}' for field in cls_object._fields])

        # create read-only property for each field
        for field in cls_object._fields:
            slot = f'_{field}'
            # this will not work!
            #     setattr(cls_object, field, property(fget=lambda self: getattr(self, slot)))
            # Remember about how closures work! The free variable is resolved when the function is called!
            # So instead we have to use this workaround, by specifying the slot as a defaulted argument
            setattr(cls_object, field, property(fget=lambda self, attrib=slot: getattr(self, attrib)))

        # create __eq__ method
        def eq(self, other):
            if isinstance(other, cls_object):
                # ensure each corresponding field is equal
                self_fields = [getattr(self, field) for field in cls_object._fields]
                other_fields = [getattr(other, field) for field in cls_object._fields]
                return self_fields == other_fields
            return False
        setattr(cls_object, '__eq__', eq)

        # create __hash__ method
        def hash_(self):
            field_values = (getattr(self, field) for field in cls_object._fields)
            return hash(tuple(field_values))
        setattr(cls_object, '__hash__', hash_)

        # create __str__ method
        def str_(self):
            field_values = (getattr(self, field) for field in cls_object._fields)
            field_values_joined = ', '.join(map(str, field_values))  # make every value a string
            return f'{cls_object.__name__}({field_values_joined})'
        setattr(cls_object, '__str__', str_)

        # create __repr__ method
        def repr_(self):
            field_values = (getattr(self, field) for field in cls_object._fields)
            field_key_values = (f'{key}={value}' for key, value in zip(cls_object._fields, field_values))
            field_key_values_str = ', '.join(field_key_values)
            return f'{cls_object.__name__}({field_key_values_str})'
        setattr(cls_object, '__repr__', repr_)

        return cls_object
- 同樣的,我們使用剛剛的 \color{greenyellow}{Person} 類別創建來驗證:
#Test1
class Person(metaclass=SlottedStruct):
    _fields = ['name']

    def __init__(self, name):
        self._name = name

type(Person) # __main__.SlottedStruct

p1 = Person('Alex')
p2 = Person('Alex')
type(p1), isinstance(p1, Person) # (__main__.Person, True)
p1 == p2 # True
hash(p1), hash(p2) # (8185734375783604362, 8185734375783604362)
repr(p1) # 'Person(name=Alex)'
str(p1) # 'Person(Alex)'

#Test2
class Point2D(metaclass=SlottedStruct):
    _fields = ['x', 'y']

    def __init__(self, x, y):
        self._x = x
        self._y = y


class Point3D(metaclass=SlottedStruct):
    _fields = ['x', 'y', 'z']

    def __init__(self, x, y, z):
        self._x = x
        self._y = y
        self._z = z

p1 = Point2D(1, 2)
p2 = Point2D(1, 2)
p3 = Point2D(0, 0)
repr(p1), str(p1), hash(p1), p1.x, p1.y # ('Point2D(x=1, y=2)', 'Point2D(1, 2)', -3550055125485641917, 1, 2)
p1 is p2, p1 == p2 # (False, True)
p1 is p3, p1 == p3 # (False, False)
'''
輸出:
(False, False)
'''
- 此外,我們還可以把 \color{lightcyan}{Person(Metaclass = SlottedStruct)} 中的 \color{lightcyan}{(Metaclass = SlottedStruct)} 用 \color{greenyellow}{Decorator} 來進一步精簡程式碼,如下程式碼,如此一來,我們只需要使用 \color{lightcyan}{@struct} 就能代替 \color{lightcyan}{(Metaclass = SlottedStruct)} 的宣告:
def struct(cls):
    return SlottedStruct(cls.__name__, cls.__bases__, dict(cls.__dict__))

@struct
class Point2D:
    _fields = ['x', 'y']

    def __init__(self, x, y):
        self._x = x
        self._y = y

type(Point2D) # __main__.SlottedStruct

p = Point2D(1, 2)
type(p) # __main__.Point2D
p.x, p.y # (1, 2)
repr(p) # 'Point2D(x=1, y=2)'
'''
輸出:
'Point2D(x=1, y=2)'
'''
157 Metaprogramming Application 2:
- 這一節老師要講的是使用 \color{salmon}{Metaprogramming} 來實現 \color{salmon}{Singleton} 單例模式(設計模式的一種,可參考維基百科上的說明: 單例模式 - 維基百科,自由的百科全書 。
- 實現單例模式的思路是:一個類別能返回對象一個引用(永遠是同一個)和一個獲得該實例的方法(必須是靜態方法,通常使用 \color{lightcyan}{getInstance} 這個名稱);當我們調用這個方法時,如果類別持有的引用不為空就返回這個引用,如果類別保持的引用為空就創建該類的實例並將實例的引用賦予該類保持的引用;同時我們還將該類別的構造函數(建構式)定義為私有方法,這樣其他處的代碼就無法通過調用該類的構造函數來實例化該類的對象,只有通過該類提供的靜態方法來得到該類的唯一實例。
- 延伸閱讀:
- 直接來看範例:
class Hundred:
    _existing_instance = None  # 定義一個屬性,用來記錄是否已經有實例存在

    def __new__(cls):
        if not cls._existing_instance: # 如果還沒有實例存在
            print('creating new instance...')
            new_instance = super().__new__(cls)
            setattr(new_instance, 'name', 'hundred')
            setattr(new_instance, 'value', 100)
            cls._existing_instance = new_instance
        else: # 如果已經有實例存在
            print('instance exists already, using that one...')
        return cls._existing_instance

h1 = Hundred() # creating new instance...
h2 = Hundred() # instance exists already, using that one...
h1 is h2 # True
'''
輸出:
creating new instance...
instance exists already, using that one...
True
'''
- 如上面這樣方式,我們就完成了一個單例的類別,但其實我們可以使用 \color{greenyellow}{Metaclass} 元類別來簡化程序:
class Singleton(type): # 定義一個 Singleton 的 metaclass
    def __call__(cls, *args, **kwargs):
        print(f'Request received to create an instance of class: {cls}...')
        if getattr(cls, 'existing_instance', None) is None:
            print('Creating instance for the first time...')
            setattr(cls, 'existing_instance', super().__call__(*args, **kwargs))
        else:
            print('Using existing instance...')
        return getattr(cls, 'existing_instance')

class Hundred(metaclass=Singleton):
    value = 100

h1 = Hundred()
h2 = Hundred()
h1 is h2, h1.value, h2.value # (True, 100, 100)

class Thousand(metaclass=Singleton):
    value = 1000

t1 = Thousand()
t2 = Thousand()
t1 is t2, t1.value, t2.value # (True, 1000, 1000)

h1 is t1, h2 is t2 # (False, False)
'''
輸出:
Request received to create an instance of class: <class '__main__.Hundred'>...
Creating instance for the first time...
Request received to create an instance of class: <class '__main__.Hundred'>...
Using existing instance...
Request received to create an instance of class: <class '__main__.Thousand'>...
Creating instance for the first time...
Request received to create an instance of class: <class '__main__.Thousand'>...
Using existing instance...
(False, False)
'''
- 然而看上去沒什麼問題,但如果我們再從一個已創建的實例類別來創建另一個類別時(換言之,讓一個新類別來繼承已創建的實例類別時),會發生什麼事呢?
class HundredFold(Hundred):
    value = 100 * 100

hf1 = HundredFold()

'''
輸出:
Request received to create an instance of class: <class '__main__.HundredFold'>...
Using existing instance...
'''
- 奇怪,明明是才剛剛新創的類別,只是因為繼承一個已經創建的單例類別,而單例的執行判斷就失誤了!!!
- 這是因為我們在設計 \color{greenyellow}{Metaclass} 時,不該讓單例寄存在被元類別創建的類別上,而是應該依存在最後要創建的對象類別(不論是在被元類別創建的類別或是繼承該擁有單例功能父類別的子類別)上,如下:
class Singleton(type):
    instances = {}

    def __call__(cls, *args, **kwargs):
        print(f'Request received to create an instance of class: {cls}...')
        existing_instance = Singleton.instances.get(cls, None)
        if existing_instance is None:
            print('Creating instance for the first time...')
            existing_instance = super().__call__(*args, **kwargs)
           # 讓使用該元類別的類別永遠只能有一個該類別的 Instance (將 key 設定成 cls)
            Singleton.instances[cls] = existing_instance
        else:
            print('Using existing instance...')
        return existing_instance

class Hundred(metaclass=Singleton):
    value = 100

class Thousand(metaclass=Singleton):
    value = 1000

class HundredFold(Hundred):
    value = 100 * 100

h1 = Hundred()
h2 = Hundred()
t1 = Thousand()
t2 = Thousand()
hf1 = HundredFold()
hf2 = HundredFold()
h1 is h2, t1 is t2, hf1 is hf2 # (True, True, True)
h1.value, h2.value, t1.value, t2.value, hf1.value, hf2.value # (100, 100, 1000, 1000, 10000, 10000)
h1 is hf1 # False

'''
輸出:
Request received to create an instance of class: <class '__main__.Hundred'>...
Creating instance for the first time...
Request received to create an instance of class: <class '__main__.Hundred'>...
Using existing instance...
Request received to create an instance of class: <class '__main__.Thousand'>...
Creating instance for the first time...
Request received to create an instance of class: <class '__main__.Thousand'>...
Using existing instance...
Request received to create an instance of class: <class '__main__.HundredFold'>...
Creating instance for the first time...
Request received to create an instance of class: <class '__main__.HundredFold'>...
Using existing instance...
False
'''
~以上就是本週讀書會課程心得分享,如有問題歡迎大家提出來一起討論~