Transactions
Lecture 45. Project Solution - Transactions
deposit
雖然都可以,但因為是 class valriable,使用 Account._transaction_codes 會比 self._transaction_codes 更合適。
transaction_code = Account._transaction_codes['deposit']
先產生 transaction code,然後才進行實際交易動作。這裡是 instance method,所以用 self.generate_confirmation_code。
conf_code = self.generate_confirmation_code(transaction_code)
展開看程式碼
    def deposit(self, value):
        if not isinstance(value, numbers.Real):
            raise ValueError('Deposit value must be a real number.')
        if value <= 0:
            raise ValueError('Deposit value must be a positive number.')

        # get transaction code
        transaction_code = Account._transaction_codes['deposit']

        # generate a confirmation code
        conf_code = self.generate_confirmation_code(transaction_code)

        # make deposit and return conf code
        self._balance += value
        return conf_code
withdraw
同理,withdraw 也是類似(class valriable & 先產生 transaction code,然後才進行實際交易動作)。
不過這裡老師刻意留了個 bug,給下一節的 Unit Testing 用。
展開看程式碼
    def withdraw(self, value):
        # hmmm... repetitive code! we'll need to fix this
        # TODO: refactor a function to validate a valid positive number
        #       and use in __init__, deposit and

        accepted = False
        if self.balance - value < 0:
            # insufficient funds - we'll reject this transaction
            transaction_code = Account._transaction_codes['rejected']
        else:
            transaction_code = Account._transaction_codes['withdraw']
            accepted = True

        conf_code = self.generate_confirmation_code(transaction_code)

        # Doing this here in case there's a problem generating a confirmation code
        # - do not want to modify the balance if we cannot generate a transaction code successfully
        if accepted:
            self._balance -= value

        return conf_code
pay interest
同理,pay interest 也是類似(class valriable & 先產生 transaction code,然後才進行實際交易動作)。
    def pay_interest(self):
        interest = self.balance * Account.get_interest_rate() / 100
        conf_code = self.generate_confirmation_code(Account._transaction_codes['interest'])
        self._balance += interest
        return conf_code
重構 refactoring
前面在做存提款必須是正實數(不含零)的確認程式碼,既然在存提款兩個 method 都會用到(事實上還有 __init__ ,之前一樣刻意留下來的 bug),那可以獨立另寫一個 (static)method。
    @staticmethod
    def validate_real_number(value, min_value=None):
        if not isinstance(value, numbers.Real):
            raise ValueError('Value must be a real number.')

        if min_value is not None and value < min_value:
            raise ValueError(f'Value must be at least {min_value}')

        # validation passed, return valid value
        return value
Happy Test
Lecture 46. Project Solution - Testing with unittest
問題:
-
只測我們預期輸入的數字,無法測到非預期的結果。
-
手工業(工人智慧)。一個個輸入測試數字,一個個觀察輸出結果。不僅耗時費力,萬一改寫程式,很多測試程式,也要跟著重寫。
Unit Test
重點:
-
隔離測試 Isolation Testing
-
每個測試
def test_xxx(self)會各自獨立執行setUp&tearDown。 -
執行順序無關:unittest 不保證 test case 間執行的順序,所以每一個 test case 都必須要做到 self-contained,不會因執行順序改變就失敗。
subtest 尚未撰寫筆記
比較複雜的測試,無法做隔離測試的,像是 Database 資料庫、或是呼叫遠端 API 等,通常會使用 Mocking Testing(最下方參考資料中,有一些文章介紹)。
撰寫 Unit Testing Code,可能比被測試的程式碼本身還龐大。
老師建議:寫程式時,同時撰寫 Unit Testing Code,不要等程式完成後再寫,那會很痛苦。(好吧,最後一句是我稍微誇大的寫法)
    @staticmethod
    def validate_real_number(value, min_value=None):
        if not isinstance(value, numbers.Real):
            raise ValueError('Value must be a real number.')

        if min_value is not None and value < min_value:
            raise ValueError(f'Value must be at least {min_value}')

        # validation passed, return valid value
        return value
通常撰寫 Unit Testing Code,會是另外獨立的 *.py 檔。不過由於老師是用 Jupyter Notebook 示範,所以就寫在同一個檔案裡了。
import unittest

def run_tests(test_class):
    suite = unittest.TestLoader().loadTestsFromTestCase(test_class)
    runner = unittest.TextTestRunner(verbosity=2)
    result = runner.run(suite)

class TestAccount(unittest.TestCase):

    def test_create_timezone(self):
        tz = TimeZone('ABC', -1, -30)
        self.assertEqual('ABC', tz.name)
        self.assertEqual(timedelta(hours=-1, minutes=-30), tz.offset)

    def test_timezones_equal(self):
        tz1 = TimeZone('ABC', -1, -30)
        tz2 = TimeZone('ABC', -1, -30)
        self.assertEqual(tz1, tz2)

    def test_timezones_not_equal(self):
        tz = TimeZone('ABC', -1, -30)

        test_timezones = (
            TimeZone('DEF', -1, -30),
            TimeZone('ABC', -1, 0),
            TimeZone('ABC', 1, -30)
        )
        for i, test_tz in enumerate(test_timezones):
            with self.subTest(test_number=i):
                self.assertNotEqual(tz, test_tz)

    def test_create_account(self):
        account_number = 'A100'
        first_name = 'FIRST'
        last_name = 'LAST'
        tz = TimeZone('TZ', 1, 30)
        balance = 100.00

        a = Account(account_number, first_name, last_name, tz, balance)
        self.assertEqual(account_number, a.account_number)
        self.assertEqual(first_name, a.first_name)
        self.assertEqual(last_name, a.last_name)
        self.assertEqual(first_name + ' ' + last_name, a.full_name)
        self.assertEqual(tz, a.timezone)
        self.assertEqual(balance, a.balance)

    def test_create_account_blank_first_name(self):
        account_number = 'A100'
        first_name = ''
        last_name = 'LAST'
        tz = TimeZone('TZ', 1, 30)
        balance = 100.00

        with self.assertRaises(ValueError):
            a = Account(account_number, first_name, last_name, tz, balance)

    def test_create_account_negative_balance(self):
        account_number = 'A100'
        first_name = 'FIRST'
        last_name = 'LAST'
        tz = TimeZone('TZ', 1, 30)
        balance = -100.00

        with self.assertRaises(ValueError):
            a = Account(account_number, first_name, last_name, tz, balance)

    def test_account_deposit_ok(self):
        account_number = 'A100'
        first_name = 'FIRST'
        last_name = 'LAST'
        balance = 100.00

        a = Account(account_number, first_name, last_name, initial_balance=balance)
        conf_code = a.deposit(100)
        self.assertEqual(200, a.balance)
        self.assertIn('D-', conf_code)

    def test_account_deposit_negative_amount(self):
        account_number = 'A100'
        first_name = 'FIRST'
        last_name = 'LAST'
        balance = 100.00

        a = Account(account_number, first_name, last_name, initial_balance=balance)
        with self.assertRaises(ValueError):
            conf_code = a.deposit(-100)

    def test_account_withdraw_ok(self):
        account_number = 'A100'
        first_name = 'FIRST'
        last_name = 'LAST'
        balance = 100.00

        a = Account(account_number, first_name, last_name, initial_balance=balance)
        conf_code = a.withdraw(20)
        self.assertEqual(80, a.balance)
        self.assertIn('W-', conf_code)


    def test_account_withdraw_overdraw(self):
        account_number = 'A100'
        first_name = 'FIRST'
        last_name = 'LAST'
        balance = 100.00

        a = Account(account_number, first_name, last_name, initial_balance=balance)
        conf_code = a.withdraw(200)
        self.assertIn('X-', conf_code)
        self.assertEqual(balance, a.balance)
unittest 模組
最前面的 run_tests 函式,使用標準的 unnitest 的流程步驟。
unittest 模組主要包括四個部份:
-
Test case(測試案例)一個
test case是一個獨立的測試單元。unittest提供一個基礎類別TestCase,可以用來建立一個新的測試案例。 -
Test fixture(測試設備)執行一或多個測試前必要的預備資源,以及相關的清除資源動作。例如可以是建立臨時性的或是代理用 (proxy) 資料庫、目錄、或是啟動一個伺服器程序。
-
Test suite(測試套件)一組測試案例、測試套件或者是兩者的組合。
-
Test runner(測試執行器)負責執行測試並提供測試結果的元件。
我們逐一介紹這四個模組:
1. Test case 測試案例
unittest 模組提供了一個基礎類別 TestCase ,你可以繼承它來建立新的測試案例。
import unittest

class TestAccount(unittest.TestCase):

    def test_create_timezone(self):
        tz = TimeZone('ABC', -1, -30)
        self.assertEqual('ABC', tz.name)
        self.assertEqual(timedelta(hours=-1, minutes=-30), tz.offset)

    def test_xxx(self):  ## <=
        ...
每個測試必須定義在一個 test 名稱為開頭的方法中(例如範例中的 test_create_timezone)。一個 TestCase 的子類別,通常用來為某個類別或模組的單元方法或函式定義測試。
2. Test fixture 測試設備
許多單元測試經常使用相同的測試設備,你可以在 TestCase 的子類別中定義 setUp 與 tearDown 方法,測試執行器會在每個測試運行之前執行 setUp 方法,每個測試運行之後執行 tearDown 方法。
class TestAccount(unittest.TestCase):
    def setUp(self):
        print('Running setup...')
        self.account_number = 'A100'

    def tearDown(self):
        print('Running tear down...')

    def test_xxx(self):
        ...
3. Test suite 測試套件
根據測試的需求不同,你可能會想要將不同的測試組合在一起。有幾種方法:
- addTest: 使用 addTest 逐一加上想做的測試。範例:
例如,zzzCase 中可能有數個 test_xxx 方法,而你只想將 test_xxx 與 test_yyy 組裝為一個測試套件的話,可以這樣做:
suite = unittest.TestSuite()
suite.addTest(zzzTestCase('test_xxx'))
suite.addTest(zzzTestCase('test_yyy'))
...
- list: 使用一個
list來定義要組裝的test_xxx方法清單。範例:
tests = ['test_xxx', 'test_yyy']
suite = unittest.TestSuite(map(zzzTestCase, tests))
- loadTestsFromTestCase: 自動載入
TestCase子類別中所有test_xxx方法。範例:
unittest.TestLoader().loadTestsFromTestCase(zzzTestCase)
- 組合技:和另外的測試套件,混合使用。範例:
suite2 = unittest.TestSuite()
suite2.addTest(suite)
suite2.addTest(OtherTestCase('test_hahaha'))  ## <= OtherTestCase('test_hahaha')
suite1 = module1.TheTestSuite()
suite2 = module2.TheTestSuite()
alltests = unittest.TestSuite([suite1, suite2])
老師課程中,使用的是第三種做法:自動載入全部 test_xxx 方法。
def run_tests(test_class):
    suite = unittest.TestLoader().loadTestsFromTestCase(test_class)  ## <=
    runner = unittest.TextTestRunner(verbosity=2)
    result = runner.run(suite)
4. Test runner 測試執行器
幾個方法:
- TextTestRunner
suite = (unittest.TestLoader().loadTestsFromTestCase(CalculatorTestCase))
unittest.TextTestRunner(verbosity=2).run(suite)
- unittest.main
verbosity:執行測試時得到更多細節(verbosity 愈高, 細節愈多)
unittest.main(verbosity=2)
- 命令列中 command line
以命令執行時,可以加上許多參考,請參考最下方參考資料的介紹。
python test_zzz.py
老師課程中,使用第一種做法。
def run_tests(test_class):
    suite = unittest.TestLoader().loadTestsFromTestCase(test_class)
    runner = unittest.TextTestRunner(verbosity=2)  ## <=
    result = runner.run(suite)  ## <=
做法相同,只是拆成兩步來做(紅色是上述範例,綠色是老師的程式),我們看一下對照:
def run_tests(test_class):
    suite = unittest.TestLoader().loadTestsFromTestCase(test_class)
-    unittest.TextTestRunner(verbosity=2).run(suite)
+    runner = unittest.TextTestRunner(verbosity=2)
+    result = runner.run(suite)
unnittest 參考資訊
以上 unnittest 的介紹,主要參考自以下網站:
unnittest 官方文件:
良葛格的 Python Tutorial:
題外話:良葛格逝世後,有點擔心他過去網路文章的保留問題。
像這個網址
openhome.cc到期日是 2023年12月17日。
Unit Test Mocking
本節老師僅提及,未做介紹。以下提供兩部分參考資料。
第一部分是簡單介紹,這部分主要由 ChatGPT 協助撰寫。
第二部分是參考資料連結。
關於 Unit Test Mocking

圖檔來源:測試中常見的名詞:Stub, Dummy, Mock..等等 | 只放拖鞋的鞋櫃
Mock Object 就是帶有判斷功能的 Stub,判斷 SUT 是不是正確地使用這個 DOC。
Stub:Stub 是一種模擬物件,用於模擬程式的某些部分,通常是被測試物件所依賴的外部系統或服務。在 Mock Testing 中,Stub 通常用於模擬物件的行為,例如模擬方法的返回值或引發異常。Stub 常常被用來測試一個模組的一個部分,而不是整個模組。
SUT:System Under Test 待測物。
DOC:Depended-On Component,SUT 所依賴的元件,也就是 Mock, Stub …想要抽換掉的元件。
Python 的 Mock Testing 是一種 Unit Test(單元測試)技術,可以模擬或替換特定程式碼的功能,並在測試中使用這些模擬對象。
這使得測試更容易、快速、可靠,因為它們可以獨立於應用程序或其他測試中的其他組件執行。
範例程式:
from unittest.mock import Mock
import requests

def get_data(url):
    response = requests.get(url)
    if response.status_code == 200:
        return response.json()
    else:
        return None

def test_get_data():
    mock_response = Mock()
    mock_response.status_code = 200
    mock_response.json.return_value = {"key": "value"}

    requests.get = Mock(return_value=mock_response)

    assert get_data("http://example.com/api/data") == {"key": "value"}
在上面這個範例中,我們想測試一個名為 get_data 的函數。這個函數從一個 URL 網址取得數據並傳回 JSON 數據,如果獲取數據失敗,則傳回 None。
在測試函數 test_get_data 中,我們創建了一個名為 mock_response 的模擬對象,並將其用於模擬 requests.get 的回應。我們可以設置模擬對象的屬性,以使其回應我們需要的數據,在這個範例中,我們將 status_code 設置為 200,並將 json 方法設置為返回一個我們指定的字典 {“key”: “value”}。
接下來,我們使用 Mock 函數將 requests.get 函數替換為我們剛剛創建的模擬對象。這將使 get_data 函數在獲取數據時返回我們指定的數據,而不是從實際 URL 網址讀取數據。
最後,我們使用 assert 語句來斷言 get_data 函數是否返回我們期望的數據。
這只是一個簡單的範例,在實際應用中,Mock Testing 可以幫助我們測試各種複雜的情況,例如非同步函數、多執行緒等。
何時適用?
在複雜的應用程式中,使用 mock testing 可以大大簡化測試過程,使開發人員更專注於實作應用程式的核心邏輯。
-
依賴外部服務或資源的應用程式:例如使用 API、資料庫、文件系統等,使用 mock testing 可以測試應用程式在這些服務不可用或出現異常時的反應。
-
模組之間有複雜的相依性:如果模組之間有複雜的相依性,使用 mock testing 可以幫助我們獨立地測試每個模組,從而更容易地找到問題並進行調試。
-
非測試環境:如果我們無法在測試環境中訪問某些資源,例如某些特定硬體或操作系統等,使用 mock testing 可以模擬這些資源,從而使我們能夠在非測試環境中進行單元測試。
-
非常規的使用情況:有時我們需要測試應用程式在非常規情況下的反應,例如錯誤輸入、異常操作等,使用 mock testing 可以輕鬆地模擬這些情況。
參考資料
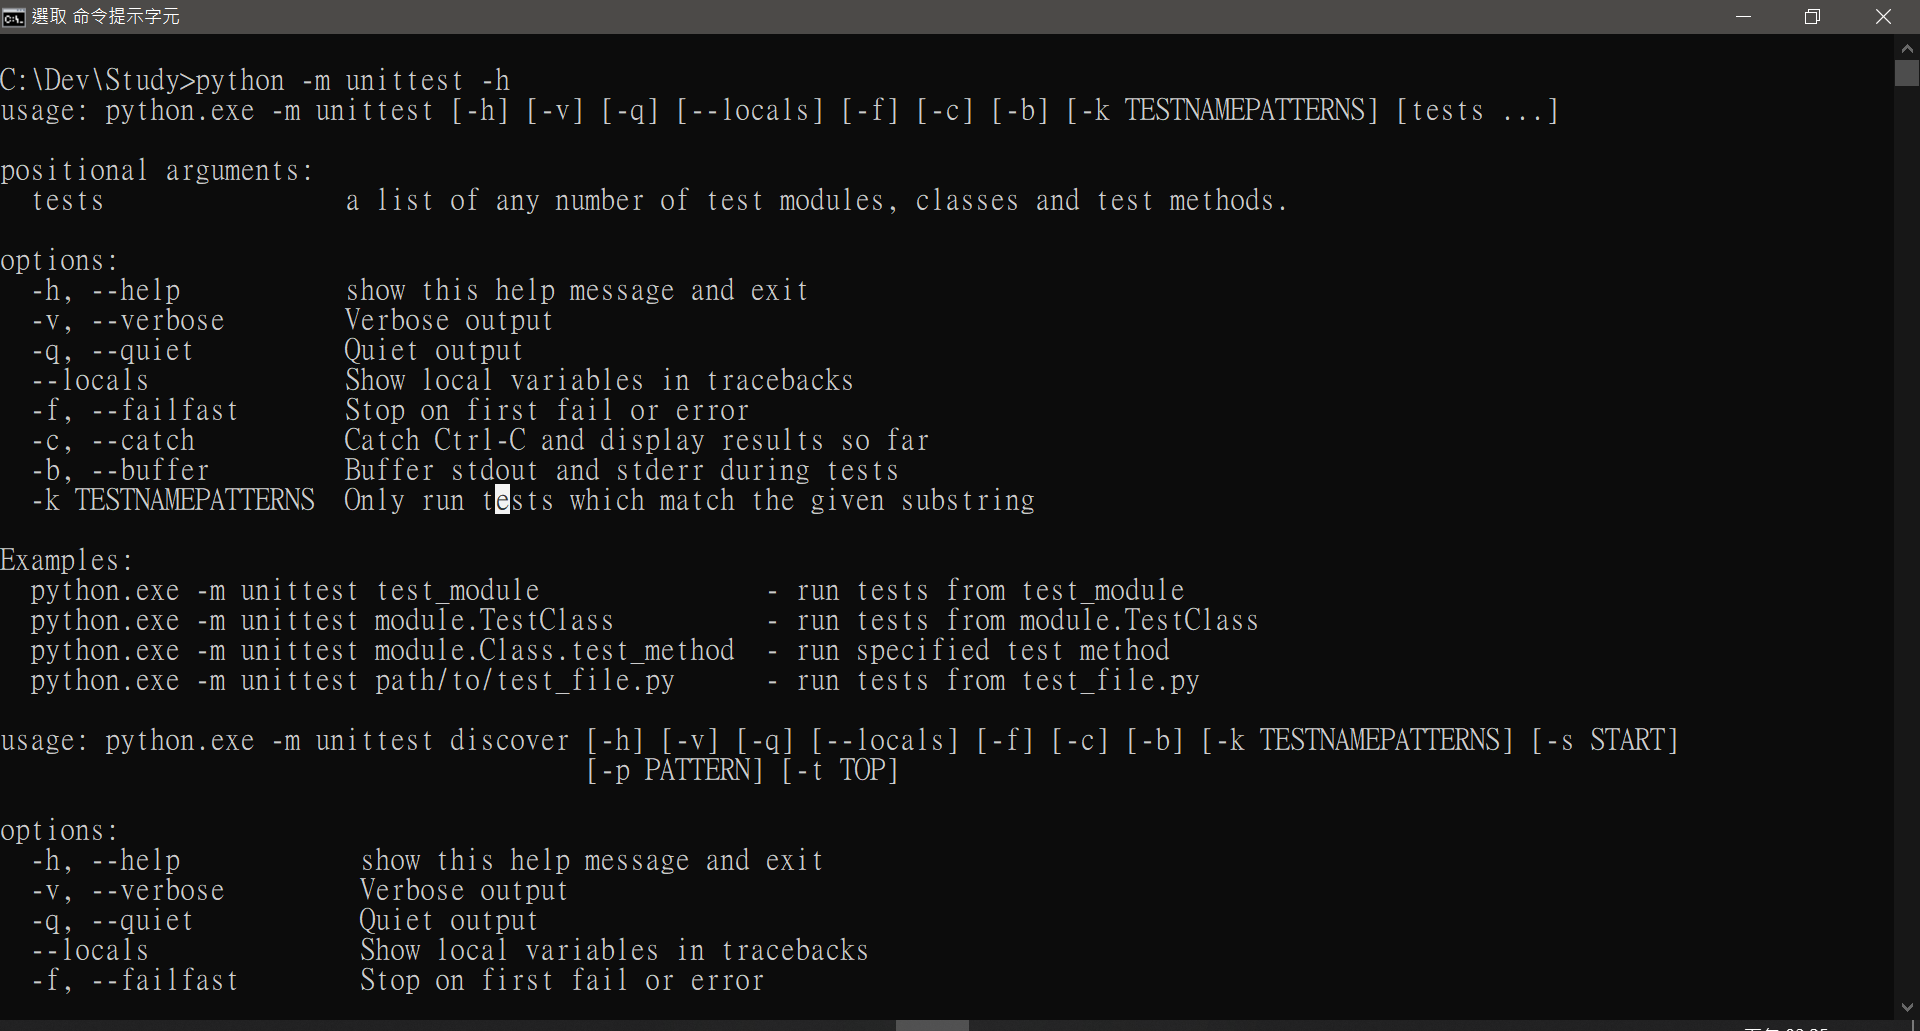
在 command line 輸入以下命令查詢 unittest 的使用說明:
python -m unittest -h
下圖為輸出範例:
assert methods
TestCase 類提供了一些 斷言方法(assert methods)用於檢查並報告失敗。 下表列出了最常用的方法(請查看下文的其他表來瞭解更多的斷言方法)。
我將老師用到的
assertXxx以黃底標註。
| 方法 | 檢查對象 | 引入版本 |
|---|---|---|
assertEqual(a, b) |
a == b |
|
assertNotEqual(a, b) |
a != b |
|
assertTrue(x) |
bool(x) is True |
|
assertFalse(x) |
bool(x) is False |
|
assertIs(a, b) |
a is b |
3.1 |
assertIsNot(a, b) |
a is not b |
3.1 |
assertIsNone(x) |
x is None |
3.1 |
assertIsNotNone(x) |
x is not None |
3.1 |
assertIn(a, b) |
a in b |
3.1 |
assertNotIn(a, b) |
a not in b |
3.1 |
assertIsInstance(a, b) |
isinstance(a, b) |
3.2 |
assertNotIsInstance(a, b) |
not isinstance(a, b) |
3.2 |
還可以使用下列方法來檢查異常、警告和日誌消息的產生:
| 方法 | 檢查對象 | 引入版本 |
|---|---|---|
assertRaises(exc, fun, *args, **kwds) |
fun(*args, **kwds) 引發了 exc |
|
assertRaisesRegex(exc, r, fun, *args, **kwds) |
fun(*args, **kwds) 引發了 exc 並且消息可與正規表示式 r 相匹配 |
3.1 |
assertWarns(warn, fun, *args, **kwds) |
fun(*args, **kwds) 引發了 warn |
3.2 |
assertWarnsRegex(warn, r, fun, *args, **kwds) |
fun(*args, **kwds) 引發了 warn 並且消息可與正規表示式 r 相匹配 |
3.2 |
assertLogs(logger, level) |
with 程式碼塊在 logger 上使用了最小的 level 等級寫入日誌 |
3.4 |
assertNoLogs(logger, level) |
with 程式碼塊沒有在logger 上使用最小的 level 等級寫入日誌 |
3.10 |
還有其他一些方法可用於執行更專門的檢查,例如:
| 方法 | 檢查對象 | 引入版本 |
|---|---|---|
assertAlmostEqual(a, b) |
round(a-b, 7) == 0 |
|
assertNotAlmostEqual(a, b) |
round(a-b, 7) != 0 |
|
assertGreater(a, b) |
a > b |
3.1 |
assertGreaterEqual(a, b) |
a >= b |
3.1 |
assertLess(a, b) |
a < b |
3.1 |
assertLessEqual(a, b) |
a <= b |
3.1 |
assertRegex(s, r) |
r.search(s) |
3.1 |
assertNotRegex(s, r) |
not r.search(s) |
3.2 |
assertCountEqual(a, b) |
a 和 b 具有同樣數量的相同元素,無論其順序如何。 | 3.2 |
以下是 assertEqual() 自動選用的不同類型的比較方法。一般情況下不需要直接在測試中呼叫這些方法。
| 方法 | 用作比較 | 引入版本 |
|---|---|---|
assertMultiLineEqual(a, b) |
字串 | 3.1 |
assertSequenceEqual(a, b) |
序列 | 3.1 |
assertListEqual(a, b) |
列表 | 3.1 |
assertTupleEqual(a, b) |
元組 | 3.1 |
assertSetEqual(a, b) |
集合 | 3.1 |
assertDictEqual(a, b) |
字典 | 3.1 |
已 棄用 的別名:
| 方法名 | 已棄用的別名 | 已棄用的別名 |
|---|---|---|
assertEqual() |
failUnlessEqual | assertEquals |
assertNotEqual() |
failIfEqual | assertNotEquals |
assertTrue() |
failUnless | assert_ |
assertFalse() |
failIf | |
assertRaises() |
failUnlessRaises | |
assertAlmostEqual() |
failUnlessAlmostEqual | assertAlmostEquals |
assertNotAlmostEqual() |
failIfAlmostEqual | assertNotAlmostEquals |
assertRegex() |
assertRegexpMatches | |
assertNotRegex() |
assertNotRegexpMatches | |
assertRaisesRegex() |
assertRaisesRegexp |
Exception hierarchy
The class hierarchy for built-in exceptions is:
BaseException
 ├── BaseExceptionGroup
 ├── GeneratorExit
 ├── KeyboardInterrupt
 ├── SystemExit
 └── Exception
      ├── ArithmeticError
      │    ├── FloatingPointError
      │    ├── OverflowError
      │    └── ZeroDivisionError
      ├── AssertionError
      ├── AttributeError
      ├── BufferError
      ├── EOFError
      ├── ExceptionGroup [BaseExceptionGroup]
      ├── ImportError
      │    └── ModuleNotFoundError
      ├── LookupError
      │    ├── IndexError
      │    └── KeyError
      ├── MemoryError
      ├── NameError
      │    └── UnboundLocalError
      ├── OSError
      │    ├── BlockingIOError
      │    ├── ChildProcessError
      │    ├── ConnectionError
      │    │    ├── BrokenPipeError
      │    │    ├── ConnectionAbortedError
      │    │    ├── ConnectionRefusedError
      │    │    └── ConnectionResetError
      │    ├── FileExistsError
      │    ├── FileNotFoundError
      │    ├── InterruptedError
      │    ├── IsADirectoryError
      │    ├── NotADirectoryError
      │    ├── PermissionError
      │    ├── ProcessLookupError
      │    └── TimeoutError
      ├── ReferenceError
      ├── RuntimeError
      │    ├── NotImplementedError
      │    └── RecursionError
      ├── StopAsyncIteration
      ├── StopIteration
      ├── SyntaxError
      │    └── IndentationError
      │         └── TabError
      ├── SystemError
      ├── TypeError
      ├── ValueError
      │    └── UnicodeError
      │         ├── UnicodeDecodeError
      │         ├── UnicodeEncodeError
      │         └── UnicodeTranslateError
      └── Warning
           ├── BytesWarning
           ├── DeprecationWarning
           ├── EncodingWarning
           ├── FutureWarning
           ├── ImportWarning
           ├── PendingDeprecationWarning
           ├── ResourceWarning
           ├── RuntimeWarning
           ├── SyntaxWarning
           ├── UnicodeWarning
           └── UserWarning
Unittest Mock
Unittest Mock 官方文件:
這篇是 2022年7月9日 的文章:
這篇是 2022年2月16日 的文章(不確定是否內容限定在 SAP):
這篇是 2014年1月7日 的文章:
Python Testing Framework
本節僅提及,不介紹。
選這兩篇文章,是因為 google 排名較前,也因為寫作日期較新。